Developer Guide
Table of Contents
1.1 About This Developer Guide
1.2 How to Use This Developer Guide
1.3 Conventions in This Developer Guide
3.1 Architecture
3.2 UI Component
3.3 Features Component
3.4 Storage Component
4.01 Add new Module
4.02 View a Module
4.03 View all Modules
4.04 Delete a Module
4.05 Add Module Components
4.06 View Module Components
4.07 Add new Review
4.08 View all Reviews
4.09 Delete a Review
4.10 Add CAP and number of MCs counted towards CAP
4.11 Add new Task
4.12 Mark/Unmark a Task as Done
4.13 Delete a Task
4.14 View all Task
4.15 Pin a Task
4.16 Add Zoom Link
4.17 Add External Links
5.1 Target user profile
5.2 Value proposition
7. Non-Functional Requirements
9. Instructions for manual testing
1. Introduction
UniTracker is a one-stop application for NUS students to keep track of their work in school. It comprises 4 key features (ModuleInfo, SU Calculator/Simulator, TaskManager, Links) that helps to organise all information they need in one place. Users are allowed to add and edit module information, tasks, zoom links to suit their needs.
This product is optimal for NUS students who prefer Command Line Interface (CLI) over Graphical User Interface (GUI).
1.1 About This Developer Guide
This developer guide was made to help the user set up UniTracker on their computer for usage, testing and further implementations. It also provides the user with all the information they need to use UniTracker alongside detailed diagrams on the implementation of our different features and how they integrate together.
1.2 How to Use This Developer Guide
Firstly, the user can refer to Section 2. Setting Up for instructions on setting up UniTracker on an IDE on their local computer.
Once UniTracker is up and running, the user can refer to the table of contents to navigate to specific sections to explore and learn about our different features and how they were implemented.
1.3 Conventions in This Developer Guide
In this developer guide, all text that appears on the CLI or in code will be written in a code block.
📝 Note!
This is a note section. Additional useful information will be written in sections such as this one.
2. Setting Up
- Ensure version 11 of Java is installed. It can be installed from here.
- Fork the UniTracker repo from here.
- Clone the fork on to the desired computer. We recommend using Sourcetree for this. Sourcetree can be downloaded from here.
- Download and open Intellij. Intellij can be downloaded from here.
- If the welcome screen cannot be seen, click
File-> ‘Close project’ to close the existing project dialog. - Set up the correct JDK version for Gradle.
- Click
Configure->Project Defaults->Project Structure - Click
New...and set it to the directory of the JDK.
- Click
- Click
Open or Importin Intellij. - Locate the
build.gradlefile, select it and clickOK. - If asked, choose to
Open as Project. - Click
OKto accept the default settings. - Right-click on the
Duke.javafile and selectRun Duke.main(). - If the set up was done right, this welcome message should be seen:
 Welcome to
   _   _               _      _____                                _
  | | | |   _ _       (_)    |_   _|     _ _    __ _      __      | |__     ___       _ _
  | |_| |  | ' \      | |      | |      | '_|  / _` |    / _|     | / /    / -_)     | '_|
   \___/   |_||_|    _|_|_    _|_|_    _|_|_   \__,_|    \__|_    |_\_\    \___|    _|_|_
 _|"""""| _|"""""| _|"""""| _|"""""| _|"""""| _|"""""| _|"""""| _|"""""| _|"""""| _|"""""|
 "`-0-0-' "`-0-0-' "`-0-0-' "`-0-0-' "`-0-0-' "`-0-0-' "`-0-0-' "`-0-0-' "`-0-0-' "`-0-0-'

This is the list of your pinned tasks:

Main Menu:
[1] Module Information
[2] CAP Simulator/Calculator
[3] Task Manager
[4] External Links
[5] Exit Program
3. Design
3.1 Architecture
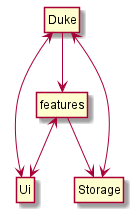
Figure 1
The Architecture Design in figure 1 above shows the design of UniTracker.
Given below are quick overviews of UniTracker’s 4 main components:
- The
Dukeclass contains the main method of our application.- At the start of the application, it initializes all the classes in sequence.
-
The Ui component handles interactions with the user and contains the methods for system output.
- The Features component contains the main classes our 4 key features.
ModuleInfo: contains methods for our module information features.HelpGraduation: contains methods for our SU calculator/simulator.TaskManager: contains methods for our task management features.Links: contains methods for our links features.
- The Storage component writes data to, and loads data from the hard disk.
3.2 UI Component
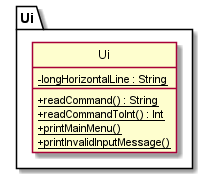
Figure 2
The class diagram of the Ui component can be seen in figure 2.
The Ui class handles user input and also contains the methods for user interface.
longHorizontalLineorganises our system output by distinguishing user input and system output.readCommand()reads user input and returns it in the form of a string.readCommandToIntalso reads user input but returns it in the form of an integer.printMainMenu()prints the main menu for UniTracker. The Ui class also contains all the menus for our other features.printInvalidInputMessage()prints the error message for invalid user inputs. The Ui class also contains other error messages.
3.3 Features Component
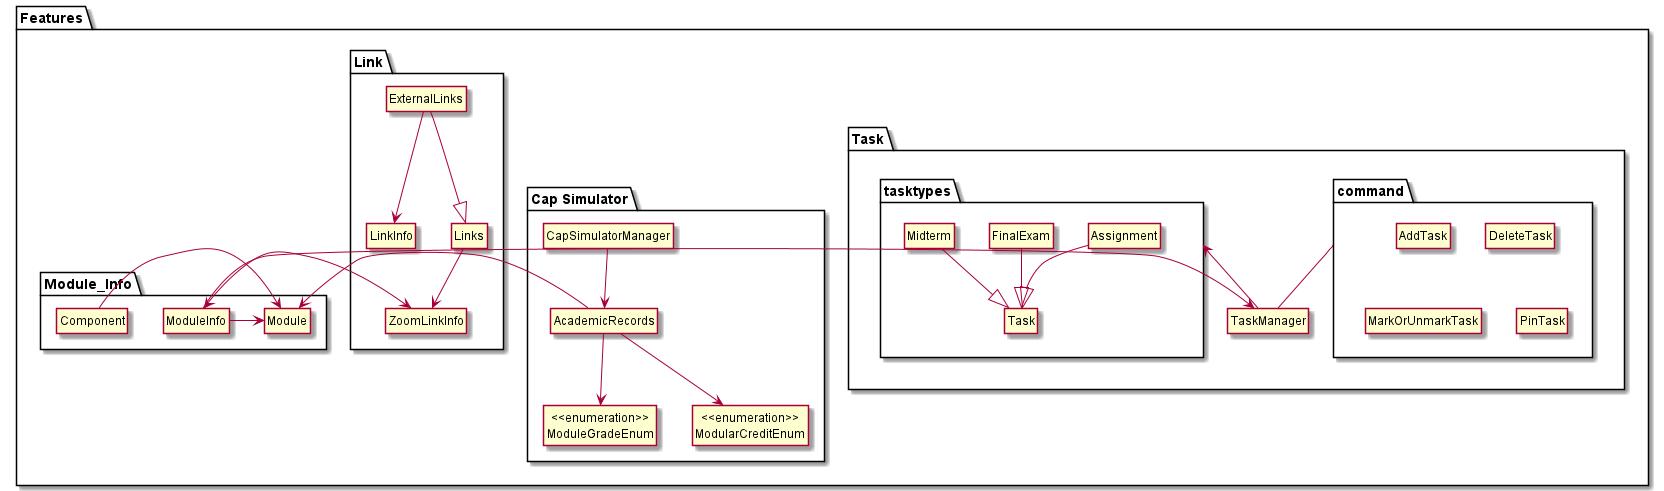 Figure 3
The class diagram for our features component can be seen in figure 3.
3.4 Storage Component
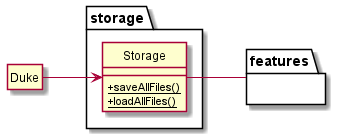
Figure 4
The storage component, as seen in figure 3, stores data in a folder named UniTracker Data on the user’s hard disk.
It also loads the data upon startup.
saveAllFiles()saves all the data from the features component into its respective text files inUniTracker Data. This method is called at the end of every execution of a command.loadAllFiles()loads the data from the text files inUniTracker Datafolder from the user’s hard disk. If the folder and text files does not exist, it will be created for the user.
4. Implementation
4.01 Add New Module
This feature is for users to add any modules from their university course into the list of modules.
All modules are stored in an ArrayList called modules.
Given below is the sequence diagram for the feature:
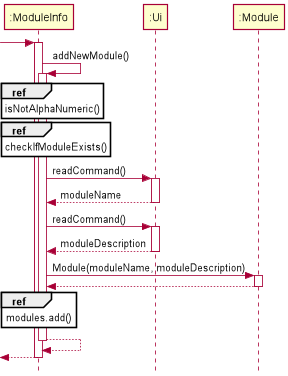
Figure 5
A general explanation of how this feature works:
- When user types in a
module name, it will be checked for:- illegal characters entered,
- if it is an empty string, and
- if a module with that exact name exists in the
ArrayListofmodules
- When
module nameis valid, and when user types in amodule description, it will be checked if it is an empty string.
4.02 View a Module
This feature allows users to view all the important information regarding a particular module (e.g. MCs, Grade, Links, Tasks, etc. ).
A general explanation of how this feature works:
- When a
moduleis chosen from the list, there will be a method within theModuleclass itself that gets the relevant class-level attributes. - This will print the important information regarding the module.
4.03 View all Modules
This feature prints out the name String attribute of the module objects in the ArrayList of modules.
4.04 Delete a Module
This feature deletes a module object from the ArrayList of modules.
Just before a successful deletion, the deleted module’s relevant information (e.g. reviews, module description, etc.) will be printed out for the user’s reference.
4.05 Add Module Components
This feature allows user to add user-defined module components and its related weightage for an existing module.
Given below is the sequence diagram of the feature:
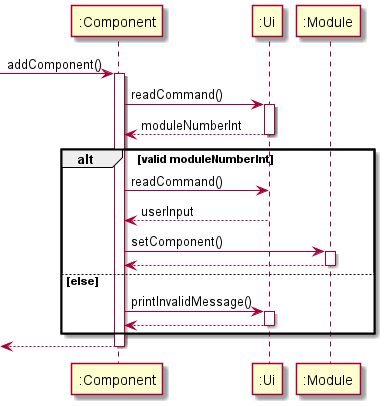
Figure 6
A general 3-step explanation of how this feature works is shown below:
Step 1. The feature is facilitated by the Component class and a call to addComponent() is performed upon
expected user input to add a new component to a module.
Step 2. A call to Ui is performed to find out what module* the user wishes to add a component (and
its weightage).
Step 3. A check is done to find whether the selection of module(an integer number) entered by the user is stored in the system.
Here, there are two possible routes:
- If the module is present, a call to
Uiis performed to get the component name and the associated weightage for that component. - If the module is not present, the call to
addComponent()returns toModuleInfoclass (main class for module-related commands).
Assuming the first route is well executed, the component (and its weightage) is stored in a
Hashtable format in the Module object specified by the user previously*.
4.06 View Module Components
This feature prints
module components (together with its weightage) stored in a Hashtable under a module specified by the user input.
A brief explanation of how the feature works:
Step 1: A check is done on the module number specified user input.
Assuming the module is present,
Step 2: getComponentstoString method in the Module object is executed to print the module components
in a Hashtable format. If the Hashtable is empty, an empty message is printed.
4.07 Add New Review
This feature allows user to add a review for any of the modules they have taken.
📝 Note!
This action will overwrite any existing reviews with the new review.
Also, anything typed after ‘/end’ will be erased!
> CS2113T is very fun:) I have learnt so many important concepts.
> Overall 10/10 :)
> /end
Woohoo~ Review added:
CS2113T is very fun:) I have learnt so many important concepts.
Overall 10/10 :)

Returning to module information menu...
Given below is the sequence diagram for the feature:
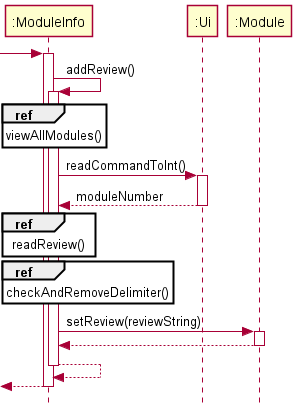
Figure 7
A general explanation of how this feature works:
A while loop is used to take in multiple lines of input until the input contains
the /end symbol. Anything typed after this /end symbol will be erased.
When overwriting this review with a new review: The old review will be printed for user reference. The user will also be alerted that this action will delete his/her old review.
4.08 View all Reviews
This feature prints each review String of all modules in the ArrayList of modules.
A brief explanation of how this works:
After checking if the modules list is empty, a ‘for’ loop is used to go through the list of modules. The review String attribute is printed through the getReview() function within the Module class.
4.09 Delete a Review
This feature allows user to delete a review from the module.
A general explanation of how this feature works:
Deleting a review would reset the review String attribute of a module to a default value
of:
"You have not reviewed this module yet."
If this default string value already existed when deleteAReview is called (i.e. if the user has not reviewed the module yet),
this same string will be printed out as a warning to the user.
4.10 Add CAP and Number of MCs counted towards CAP
This feature allows user to add cumulative average point(CAP), that ranges between 0 - 5, with 2 decimal places of precision, and total number of modular credits(MCs) that is counted towards CAP.
Given below is the sequence diagram for the feature:
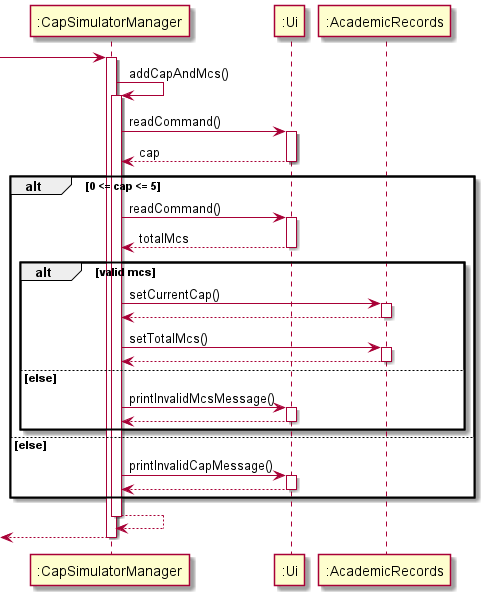
Figure 8
A general 3-step explanation of how this feature works is shown below:
Step 1. The feature is facilitated by the CapSimulatorManager object, and a call to the
class to AddCapAndMcs method is performed upon entering this sequence of numbers from the main menu:
2, 1.
Step 2. A call to readCommand() method in the Ui object is performed to get the CAP score.
-
Here, there are two possible routes:
- If the CAP is valid, a call to
readCommand()method in theUiobject is performed to get the total MCs counted into the CAP. - If the CAP is not valid, a call to
printInvalidCAPMessage()method inUiis performed to print an invalid CAP message and returns to the main program.
- If the CAP is valid, a call to
Assuming the first route is well executed,
Step 3. There are two possible routes:
- If the MCs is valid, a call to
setCurrentCap()andsetTotalMcs()method is facilitated byAcademicRecordsclass and stores the CAP and MCs. - If the MCs is not valid, a call to
printInvalidMcsMessage()method inUiis performed to print an invalid MCs message and returns to the main program.
4.11 Add New Task
This feature allows the user to add tasks of type normal task, assignment, midterm, final exam to a
task list.
All task types (except normal task, which contains arguments 1, 2 and 5 only) contain 5 arguments upon
creation:
1) Module Code
Example: CS2113T
2) Task Description
Example: Finish v2.0
3) Date
Example: 2021-03-21
4) Time
Example: 23:59
5) Message
Example: Good job!
Given below is the sequence diagram for the feature:
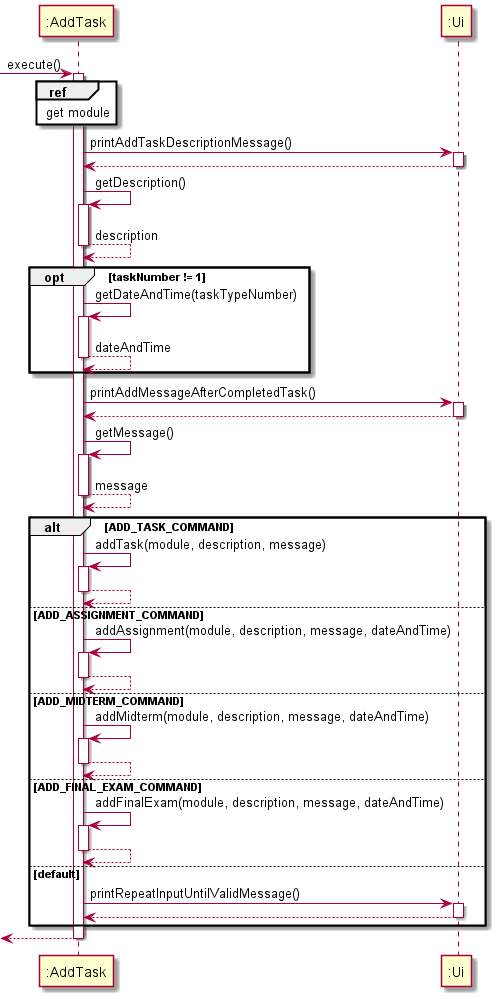
Figure 9
A general explanation of how this feature works:
- When the user calls this feature, the application will prompt them to input the arguments required for task creation.
- If there are no existing modules, the user can either exit the command or create a new module. Otherwise, the user can select the module from the existing list of modules.
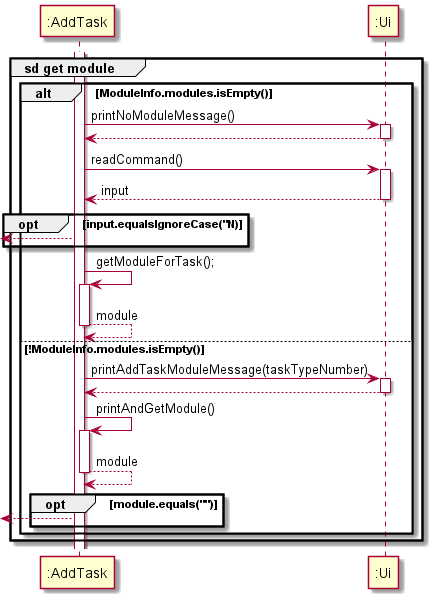
Figure 10 - The user has to input a valid format for the date and time field (refer to section 3.3.1 of User
Guide or the example above), and our application will convert it to a more readable format for the
user. Using the example above,
2021-03-21will be outputted asMar 21 202123:59will be outputted as11:59 PM
- The user input for message (argument 5 above) will be printed out when the user marks the task as done, signalling completion.
- This new task will then be stored into an
ArrayListfor its task type for future reference.
4.12 Mark/Unmark a Task as Done
This feature allows the user to mark or unmark tasks of type normal task, assignment, midterm, final exam as done.
Given below is the sequence diagram for this feature:
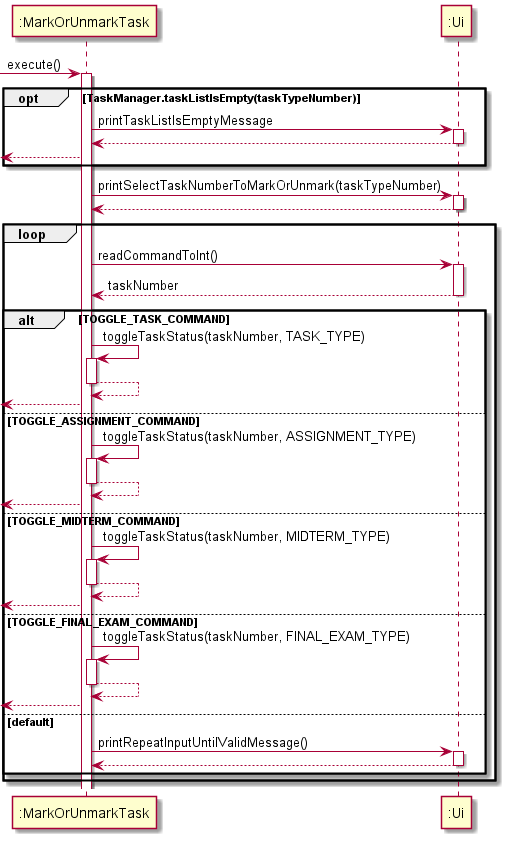
Figure 11
A general explanation of how this feature works:
- When the user calls this feature, the application will prompt them to choose the task
type (
normal task,assignment,midterm,final exam) of the task they want to mark/unmark. - All existing tasks in the ArrayList for the task type they chose will then be printed out, and the user has to input the index of the task they want to mark/unmark.
- Depending on the current status of the task, the user will be informed of the current status of the task and be asked if they want to change it.
- Upon marking a task as done, the message that the user inputted upon creation of this particular task will then be printed out.
4.13 Delete a Task
This feature allows the user to delete a task of type normal task, assignment, midterm, final exam
from a task list.
Given below is the sequence diagram for this feature:
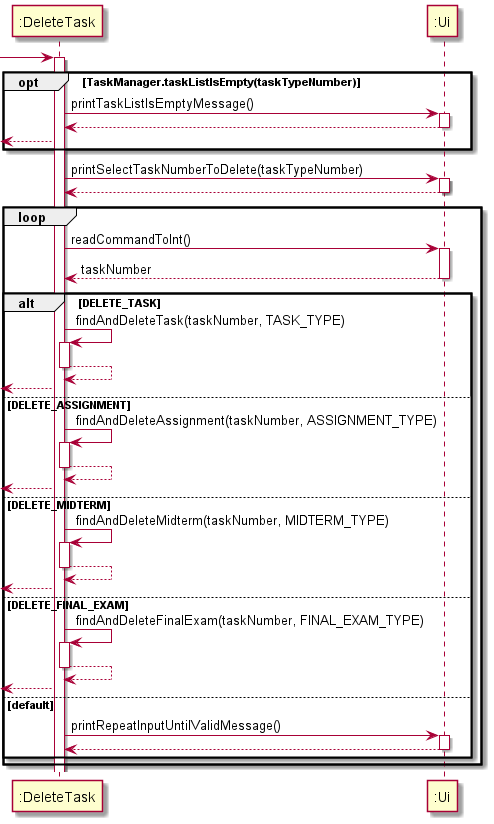
Figure 12
A general explanation of how this feature works:
- When the user calls this feature, the application will prompt them to choose the task
type (
normal task,assignment,midterm,final exam) of the task they want to delete. - All existing tasks in the
ArrayListfor the task type they chose will then be printed out, and the user has to input the index of the task they want to delete. - The task they select will then be deleted from the
ArrayList.
4.14 View All Tasks
This feature allows the user to view all their existing tasks for all task types.
Given below is the sequence diagram for this feature:
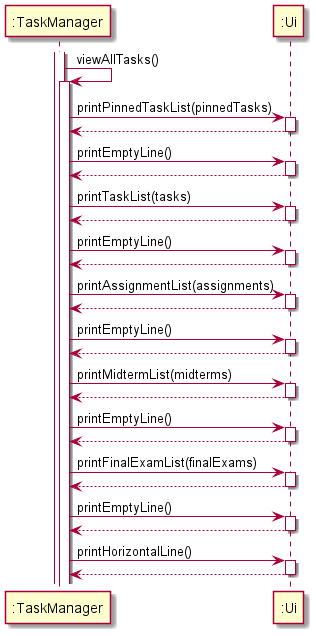
Figure 13
A general explanation of how this feature works:
- When the user calls this feature, the application will iterate through and print out the all the task list.
- It starts with the pinned tasks, then followed by the
normal tasklist,assignmentlist,midtermlist andfinal examlist.
4.15 Pin a Task
This feature allows the user to pin a task of type normal task, assignment, midterm, final exam
from a task list.
Given below is the sequence diagram for this feature:

Figure 14
A general explanation of how this feature works:
- When the user calls this feature, the application will prompt them to choose the task
type (
task,assignment,midterm,final exam) of the task they want to pin. - All existing tasks in the
ArrayListfor the task type they chose will then be printed out, and the user has to input the index of the task they want to pin. - The pinned task list is stored using a HashMap, with the key being the task type and value being an ArrayList. The task the user selected will then be added to the respective pinned task ArrayList corresponding to the task type they chose.
4.16 Add Zoom Link
Given below is the sequence diagram for the feature:
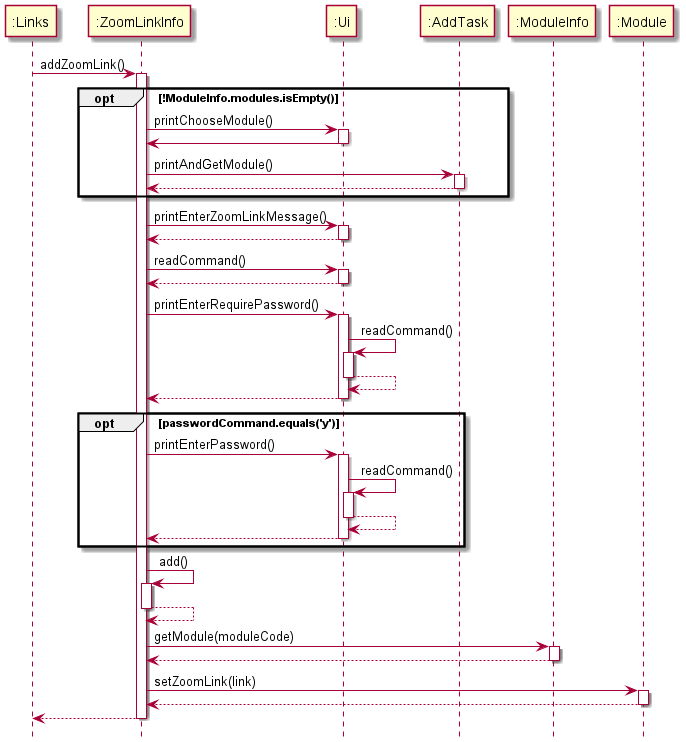
Figure 15
A general 4-step explanation of how this feature works is shown below:
Step 1. The ZoomLinkInfo#addZoomLink() method calls AddTask#printAndGetModule() which asks the user to input the number corresponding to the module code they want, and returns the module code.
Step 2. The ZoomLinkInfo#addZoomLink() method calls other methods in the Ui class to determine the link, and whether a password is required for the Zoom meeting.
📝 Note!
If the user does not require the zoom link to be tagged to a module, AddTask#printAndGetModule() in Step 1 would return an empty string, and the module code would be initialised to “Zoom link has no module code”.
Step 3. The ZoomLinkInfo#addZoomLink() method then calls ModuleInfo#getModule() in order to retrieve the module object which is stored in the ModuleInfo class.
Step 4. Module#setZoomLink then sets the zoomLink attribute of the module object to the zoom link
that was entered.
4.17 Add External Links
This feature allows users to add and store their favourite links.
Given below is the sequence diagram for the feature:
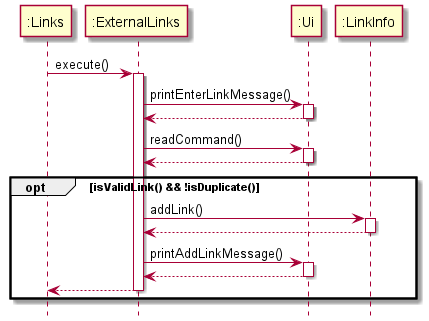
Figure 16
A general 2-step explanation of how this feature works is shown below:
Step 1. The Ui#printEnterLinkMessage() method prompts the user to enter the link and Ui#readCommand captures the input.
Step 2. If the link is valid and is not a duplicate, then LinkInfo#addLink() is called, which creates an object LinkInfo with the link description and adds it into the links list.
📝 Note! The program is case-sensitive and only accepts links that start with https and http, followed by “://www.” + domain name + top level domain
For example: https://www.youtube.com or http://www.imf.org would be accepted. Other variations that do not follow these guidelines might not work!
The program checks for duplicates by doing a simple linear search of all LinkInfo objects in the links list. If the object can be found within the list, then a duplicate link must exist.
5. Product scope
5.1 Target user profile
This product is for NUS students to help them to keep track/add/edit module information, and deadlines. This product is for users who prefer CLI to GUI.
5.2 Value proposition
Our product is user-specific as it allows users to customize and personalize their own module information and deadlines to suit their needs. Our product also allows users to organize their own schedules and keep track of their deadlines all on one platform.
Information and materials of our various modules are on varying platforms; some could be on Luminus, or the professor’s personal websites, or sent to us via email, or on Wiki.nus. We want to solve the issue of being disorganized and confused over not knowing or remembering where certain information is.
By using UniTracker, users will be able to store all necessary details on one platform so that they can keep track of commonly accessed information while keeping track of the tasks they have.
6. User Stories
| Version | As a … | I want to … | So that I can … |
|---|---|---|---|
| v1.0 | new user | have a list of command suggestions to choose from | navigate the platform easily |
| v1.0 | new user | see usage instructions | refer to them when I forget how to use the application |
| v1.0 | student | add zoom links | find them more quickly without always having to log into LumiNUS or checking the email |
| v1.0 | student | add external links | refer to them more easily |
| v1.0 | student | add deadlines to some tasks | record when a task needs to be done |
| v1.0 | student | categorize my tasks | know whether a task is a normal task, assignment or exam |
| v1.0 | student | add messages that will print when I complete a task | encourage or remind myself of what I need to do next |
| v1.0 | student | add personal reviews on modules I have taken | know what to recommend to my peers |
| v1.0 | student | add grades and mcs to each module | see how different grades will affect my cumulative average point |
| v1.0 | student | list out the component and weightage of a module | know the assessment breakdown of the module |
| v2.0 | student | store my information | view them later without having to re-type them again |
| v2.0 | impatient student | use an application that doesn’t crash | trust it to store my module information |
7. Non-Functional Requirements
- Must be able to work on any Mainstream OS as long as Java 11 (or above) is installed.
- Must be able to work completely offline.
8. Glossary
- Mainstream OS: Windows, Linux, macOS
- Domain name: The actual name of the website. For example, ‘google’ in ‘google.com’ is the domain name
- Top-level domain: .com , .net, .org , .edu etc.
9. Instructions for manual testing
Initial Launch
- Download the jar file and copy into an empty folder.
- Refer to this website to set up the application.
Adding/Deleting a Module
- You may add a module by the following commands:
1,1(from main menu). Enter themodule nameanddescription. You may choose to keep illegal characters in your module name.- For example, by entering
CS2113T@NUSas themodule name, the@symbol is seen as a non-alphanumeric character. You will be prompted to confirm the use of such characters. - Refer to this link for more instructions.
- For example, by entering
- You may delete a module by the following commands:
1,4(from main menu). Enter the number of themodulefrom the list you want to delete.- Refer to this link for more instructions.
Adding/Deleting a Task
- You may add a
taskto amoduleby the following commands:1,11OR3,1(from main menu). Select thetask typeand themodule.- If you want to add a
taskto a newmodule, type a number that is NOT in the list of modules. - Refer to this link for more instructions.
- If you want to add a
- You may delete a task by the following commands:
1,12OR3,3(from main menu).- Refer to this link
Adding/Deleting Zoom Links
- You may add a
zoom linkto amoduleby the following commands:1,13OR4,2(from main menu). Select themoduleand enter thezoom link(and password).- Refer to this link for more instructions.
- You may delete a
zoom linkby the following commands:1,14OR4,3(from main menu).- Refer to this link for more instructions.
Calculating CAP
- To calculate actual
CAPscore - enter1,2,1(from main menu). This will calculate your CAP based on the grades you have entered for eachmodule. - To simulate expected
CAPscore - enter1,2,2(from main menu). This will prompt you to enter thegradeandMCsfor the simulatedmodules.- Type
okto end simulation and print out your simulatedCAPscore.
- Type
- Refer to this link for more instructions.
Saving Data
- All information related to UniTracker will be stored in the root folder of the jar file, under the
UniTracker Datafolder. - In the event of a corrupted file or if a file is tampered with, UniTracker will print an
errormessage, and you may not be able to run the application. To resolve this, please delete theUniTracker Datafolder. The program will create a newUniTracker Datafolder.